RSS

Monthly Archives: October 2011

Tomato Cobbler

Tomato Cobbler

I cannot pinpoint the exact reason it took me so long to make this savory tomato cobbler. Learn from my mistake, do not wait to make this. The biscuits are full of cheesy, hearty goodness with a crispy top and melt-in-your-mouth body. The Gruyère is the perfect accompaniment to the juicy little tomatoes (which are oh so delicious!), the caramalized onions, the garlic & rosemary all work in harmony. * The only change I made to the recipe was swapping the rosemary for thyme and only because I didn’t have thyme, and you just can’t skip on the herbs.*  I also want to point out that it calls for 3 pounds of tomatoes, not 3 cups! I misread the ingredients the first go-round. One pint of grape tomatoes weighs 10 ounces, so you will need approximately 5 pints. I know it seems like a lot of tomatoes, but it makes a massive amount of delicious food.

I love tomatoes, they are a staple in our home. It’s safe to say we eat tomatoes everyday. I cannot think of a recipe, that has cooked tomatoes in it, that is better! This one takes the cake (or should I say cobbler), it is my new favorite side!  I am anxious to make this for our Thanksgiving Day dinner. Actually, I should probably make two because I know most of us will be making a trip for seconds. This savory cobbler will undoubtedly impress your family or guests at the dinner table. It is definitely worth the time it takes to prepare it. I found that my cooking time was significantly less, by about 25 minutes. I would keep an eye on it after about the 40 minute mark. * Note to self, check the accuracy of the temp in my oven*  This dish would also be a hit at any office party or your next “bring a dish” gathering, as it reheats well. Thanks to Annie, of Annie’s-Eats  who posted this scrumptious recipe last month! I would love to hear from you, let me know what you think!

tomaot cobbler

Ingredients
For the filling
2 tbsp. extra virgin olive oil
2 tbsp. unsalted butter
2 medium yellow
onions, thinly sliced
4 cloves garlic, minced
1 tsp. fresh thyme
3 lbs. cherry or grape tomatoes
3 tbsp. all-purpose flour
¼ tsp. red pepper flakes
1½ tsp. coarse salt
Pinch of black pepper

For the biscuit topping
2 cups all-purpose flour
2 tsp. baking powder
1 tsp. salt
8 tbsp. cold unsalted butter, cut into pieces
1 cup grated Gruyère cheese, plus extra for sprinkling
1½ cups heavy cream

Directions
To prepare the filling, combine the oil and butter in a large skillet over medium heat.  Add the onions
and cook, stirring occasionally, until cooked down and caramelized, about 20-25
minutes.  Stir in the garlic and thyme and cook until fragrant, 1-2 minutes
more.  Remove from the heat and let cool.

Preheat the oven to 375˚ F.  In a large bowl, combine the onion mixture, tomatoes, flour, red pepper flakes, salt and pepper.
To make the biscuit topping, combine the flour, baking powder and salt in a
medium bowl.  Cut in the butter with a pastry blender or two knives until the
mixture is crumbly and small clumps form. I used my hands, since I don’t have a pastry blender and the knife trick doesn’t work for me. Mix in the cheese.  Stir in the cream
with a fork until a sticky dough forms and the dry ingredients are
incorporated.

Transfer the tomato mixture to a 9 x 13-inch baking dish.  Using a large ice cream scoop or a ¼-cup measure, drop clumps of the biscuit dough evenly over the tomato mixture.  Sprinkle the top with
additional grated cheese.  Bake until the tomatoes are bubbling and the biscuits
are golden, about 1 hour and 10 minutes.  Let cool 20 minutes before serving.

Source: Annie’s Eats via Martha Stewart Living July 2011 via Pink Parsley Catering


Tags: , , , , ,

Blueberry Pancakes

I find great joy in waking up early and making breakfast for my family. Maybe it is because my children have yet to reach full-throttle mode! One by one, they find their way to the kitchen and plop down in a bar stool. They sit watchfully, with sleepy eyes as I cook up their morning meal. As I zip around the kitchen cooking (and sipping coffee) we start chatting, and that is what I love so much! I cherish the small talk and easy conversation we share in the mornings. I think this is when we actually catch up with what is going on in each others lives. These conversations are incredibly important to me. So… moving on to the pancakes 🙂 I have been making these for quite some time now and they have remained my kids favorite. The recipe was submitted by Kris to allrecipes.com  I tweaked the recipe a bit to suit our tastes. If you are not a fan of blueberries you can simply leave them out, the rest of the recipe will stay the same. I serve these pancakes with chicken, apple and maple sausage; they make a perfect pair!

On that note, get up early and go make breakfast for your family. It will feed your soul and your belly!

Blueberry Pancakes

Ingredients

  •                     1-1/2 cups milk
  •                     1/4 cup white vinegar
  •                     2  cups all-purpose flour
  •                     1/4 cup white sugar
  •                     2 teaspoons baking powder
  •                     1 teaspoon baking soda
  •                     1 teaspoon salt
  •                     2 eggs
  •                     1/4 cup butter, melted
  •                     1 1/2 cups fresh or frozen blueberries
  •                     cooking spray

Directions

  • Combine milk with vinegar in a medium bowl and set aside for 5 minutes to “sour”.
  • Combine flour, sugar, baking powder, baking soda, and salt in a large mixing bowl. Whisk egg and butter into “soured” milk. Pour the flour mixture into the wet ingredients and whisk until lumps are gone.
  •  Heat a large skillet over medium heat, and coat with cooking spray. Pour 1/4 cupfuls of batter onto the skillet, drop 5-8 bluberries onto each pancake, and cook until bubbles appear on the surface. Flip with a spatula, and cook until browned on the other side.   *Only flip pancakes once while cooking.


Tags: , , ,

Crispy Baked Eggplant

Eggplant, oh how I love thee!
For those of you who enjoy the greatness of eggplant, you should definitely give this recipe a whirl. For the rest of you, those who are yet realize that you are a fan, this is where it will begin.

First for a little eggplant education, thanks to Amanda of C&L Farms. Have you ever wondered why some eggplant are full of seeds and others aren’t?  While I was out shopping at the local produce stand the other day I was informed that there is infact male and female eggplants. Who knew! Well, as you might guess the females are the ones full of seeds. The males have seeds in them as well, just not near as many. The females, with all of their seeds pack a stronger, more bitter taste than the males do. It is strictly a matter of preference as to which one you like. I know for me I lean more towards the male.

So, how can you tell the difference without cutting into the fruit, yes I said fruit, eggplant is a fruit not a vegetable? The male eggplant has a dash-like marking on the bottom while the female has round indention or dimple marking. In the picture below the female is on the right and the male is on the left. The marking isn’t always a clear, sometimes it is more like a combination of the two.


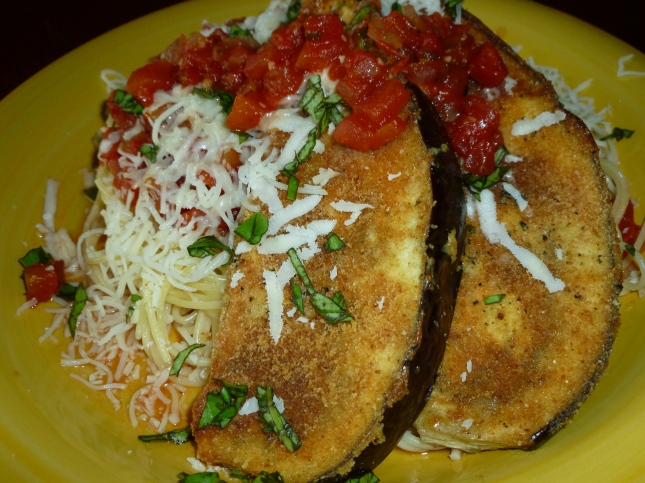
I have baked eggplant numerous times, most of the time it turns out nicely. I have always used the standard combination of eggwash first, then breadcrumbs, seasonings and cheese. Spray a pan with non-stick spray, add the breaded eggplant, spray the eggplant with spray and toss it into the oven. Very easy, and just as common. I wanted to make this eggplant great! I was trying  to achieve a crispy crunch on the outside while leaving the inside soft and creamy without overcooking this delicate vegetable.  My mission was successful 🙂 this recipe is not as healthy as it usually is when I bake it, but it is still much more heart and figure friendly than the fried version that is served at most restaurants.

Okay, my secret weapon is mayonnaise. Now, I do not use mayo very often and I have never really cared much for it. I almost never use it as a condiment but I am finding it is addition to certain recipes and this is definitely one of them. I actually prefer this method of preparing the breaded eggplant over the fried version, even if the health benefits weren’t at stake!

As you can see I served the eggplant over pasta and a simple tomato sauce. It would also be fabulous served as an appetizer or side dish. You could cut the eggplant into sticks and then follow the same directions and serve them with a spicy yogurt dipping sauce or a marinara.

Ingredients

  • 2 medium eggplant
  • 2 cups of Italian bread crumbs
  • 1 teaspoon dried  parsley
  • 1/2 teaspoon dried garlic
  • sea salt & pepper to taste
  • 2 eggs
  • 1 generous Tablespoon of mayo
  • olive oil (enough for drizzling & coating the pan)

Directions

  • Preheat the oven to 375 degrees
  • Line a cookie sheet with foil lightly spray with non-stick spray and grease with olive oil
  • Beat the eggs and mayo together
  • In a separate bowl or large plate mix the breadcrumbs, parsley, garlic, salt and pepper together
  • Slice the eggplant into 1 inch thick slices
  • Dunk in the egg/mayo mixture, shaking of any excess
  • Dredge in the breadcrumb mix, be sure to coat all sides evenly & place on cookie sheet
  • Drizzle olive oil on the eggplant (side facing up) about 1-2 Tablespoons
  • Bake 12-15 minutes, carefully flip the eggplant, try not to puncture while flipping
  • Return to the oven for an additional 12-15 minutes
  • Garnish with freshly grated pecorino-romano cheese!

I always love feedback! So, let me know how you like this dish! I assure you, this is Good Vittles!


Leave a comment

Posted by on October 16, 2011 in Uncategorized


Spiced Pumpkin Bread

I hope everyone is enjoying the kickoff to this Fall season! I know the miniscule drop in the  humidity has made a noticeable difference here in SW Florida. There still are not any weather predictions that would call for a jacket (or even sweater for that matter) however,  I am wishful that cooler temps are soon to come. Fall is probably the most welcomed seasoned of all for me. After the long, hot summer days and nights that bring along with it stifling heat that will literally take your breath away and humidity that makes you feel as if you are living in a giant sauna, the cool air and drop in humidity are as anxiously awaited here in the south. I am sure the warmth of the summer months are as embraced in the north as the fall and winter are in the south. One of these years I am going to spend Autumn somewhere that the leaves change colors! Several years ago I was able to spend two and a half days in Indiana (for the Patriots – Colts game) during November, and I fell in love with the leaves. I know that is probably quite goofy to those of you who live somewhere that actually has seasons. You might even think of the leaves as a chore, I hear you have to rake and bag them all up…

So any ways, I am trying to bring as much of the season into our home with pumpkin, winter squash and apples in as many of our meals and snacks as I can. This is a bread that I have been making since 2001 and, I plan on making it until I am not longer capable. Back then I worked in a small office. It was just the couple who owned the business and myself in a small room. Our desks practically touched. Debbie, the lady I worked for, came walking in the Wednesday morning before Thanksgiving break bearing these littles loaves of bread, all wrapped up nicely as a gift. If I recall correctly, she gave me four. One for me, one for my parents, and one for each of my girls. Embarrassingly, I think I left that day with only one loaf. I could not stop eating this bread. It is so unbelievably delicious! I must have made really big impression on her, with my bread consumption. The following month I received a cookbook (Gulfshore Delights, 1984) from her for Christmas. On the inside cover she had jotted me a note that read, “This has the recipe for pumpkin bread – plus many other dishes I think you will enjoy. There is even a recipe in this book I submitted. Can you guess which one? I bought two of these books many years ago and I saved it for just the right person. Forever, Deb”  How sweet! I never actually found out if her recipe was the pumpkin bread, but it must be right?

Treat yourself, and someone else for that matter, and make this bread. It isn’t in any way spicy, just bursting full of flavor! And, it is a one bowl bread recipe! That means it is super easy to throw together and just as simple to clean up. I baked it in 4 mini loaf pans this go-round just adjust your baking time accordingly, until a toothpick comes out clean. I filled each pan with one cup of batter. For two of the loaves I sprinkled chopped walnuts on the top before baking. That is strictly a matter of preference. I like that crunch that the nuts add to the bread.

Spicy Pumpkin Bread

  • 1 1/2 cups sugar
  • 1 teaspoon baking soda
  • 2 eggs, well beaten
  • 1/2 cup vegetable oil
  • 1/2 cup water
  • 1/4 teaspoon baking powder
  • 3/4 teaspoon salt
  • 2 teaspoons cinnamon
  • 1 teaspoons ground cloves
  • 2 teaspoons nutmeg
  • 1 cup canned pumpkin (not pumpkin pie mix)
  • 1 2/3 cup sifted all-purpose flour (I have made this bread several times in a hurry without sifting and it turned out great, but if you have time sift. It produces a lighter more consistent bread)

Directions

  • Preheat oven to 325 degrees. Mix all ingredients. Pour into a greased 5×9″ loaf pan. Bake 1 1/2 hours. For four mini loaf pans and bake for about 35 – 40 minutes.


Tags: , ,

Homemade Fresh Ricotta Cheese


Ricotta cheese is good. You can stuff pasta with it, bake a ricotta pie, add it to mashed potatoes, top your pizza, pair it with fresh fruit, ricotta on top of figs and drizzled it with honey is out-of-this-world, eat it right out of the container, canoli, the list could go on and on… I have always liked ricotta cheese with its mild taste and smooth texture make it easy to incorporate into many meals.

Prior to yesterday the thought of making cheese had not really crossed my mind. Cheese was one of the items you buy at the grocery store, not whip up in your kitchen. Let me tell you friends, I will never buy ricotta again! The difference in taste and texture of the homemade in comparison to store-bought is basically indescribable. The best way I can explain the difference would be like asking you if you would rather eat a hamburger steak or filet mignon! Really, it is that good. While the cheese was straining in a cheesecloth lined colander on the counter, I took a spoon and had a small sample. That was all it took, I knew I had found something good, a new favorite food (I have many favorites) I am hooked! Homemade ricotta cheese is fantastic!

One day, very soon, I will attempt to make fresh mozzarella . A while back I posted a recipe for Caprese, which is my first choice of appetizers, hands down. This was also the winning entry for September’s recipe contest at  C & L Farms, located in Alva, FL. I absolutely love this salad as it is, and I can only imagine how much better it would be with homemade cheese! I am so looking forward to this 🙂 I will definitely let you know how it turns out.

Back to the ricotta, as you will see below this recipe only calls for four (4) ingredients and it is super easy, you don’t even need a thermometer!

Ingredients

  • 4 cups of whole milk
  • 2 cups of heavy cream
  • 1 generous teaspoon of sea salt
  • 3 generous Tablespoons White Wine Vinager


Directions

  • Line a sieve or colander with 2 layers of dampened cheesecloth. Put the colander over a large bowl.
  • Pour the milk and cream into a stainless-steel or enameled pot. Stir in the salt. Bring to a full boil over medium heat, stirring occasionally. Turn off the heat and stir in the vinegar. Allow the mixture to stand for 1 minute until is curdles. It will separate into thick parts (the curds) and the milky parts (the whey).
  • Pour mixture into the cheesecloth-lined sieve and allow it to drain into the bowl at room temperature for about 25 minutes. The longer you allow the mixture to drain, the thicker the ricotta.
  • Transfer the ricotta to a bowl, discarding the cheesecloth and the liquid in the large bowl.
  • Use immediately or cover with plastic wrap and refrigerate. The cheese will keep refrigerated for 4 to 5 days.


Do yourself a favor and make a batch of this deliciousness! I would love to hear what recipes you use that call for ricotta cheese.

The picture at the top and bottom of this page is:

1 baguette sliced and put under the broiler until crisped on the top, rub with a clove of mashed garlic (the garlic catches on the crispy bread) add a dollop of ricotta cheese, drizzle with extra virgin olive oil, sea salt & cracked black pepper to taste and garnish with fresh rosemary! Good Vittles friends 🙂 enjoy

This recipe has been adapted from Barefoot Contessa, 2010


Tags: , , , , ,