RSS

Category Archives: Breads & Muffins

Tomato Cobbler

Tomato Cobbler

I cannot pinpoint the exact reason it took me so long to make this savory tomato cobbler. Learn from my mistake, do not wait to make this. The biscuits are full of cheesy, hearty goodness with a crispy top and melt-in-your-mouth body. The Gruyère is the perfect accompaniment to the juicy little tomatoes (which are oh so delicious!), the caramalized onions, the garlic & rosemary all work in harmony. * The only change I made to the recipe was swapping the rosemary for thyme and only because I didn’t have thyme, and you just can’t skip on the herbs.*  I also want to point out that it calls for 3 pounds of tomatoes, not 3 cups! I misread the ingredients the first go-round. One pint of grape tomatoes weighs 10 ounces, so you will need approximately 5 pints. I know it seems like a lot of tomatoes, but it makes a massive amount of delicious food.

I love tomatoes, they are a staple in our home. It’s safe to say we eat tomatoes everyday. I cannot think of a recipe, that has cooked tomatoes in it, that is better! This one takes the cake (or should I say cobbler), it is my new favorite side!  I am anxious to make this for our Thanksgiving Day dinner. Actually, I should probably make two because I know most of us will be making a trip for seconds. This savory cobbler will undoubtedly impress your family or guests at the dinner table. It is definitely worth the time it takes to prepare it. I found that my cooking time was significantly less, by about 25 minutes. I would keep an eye on it after about the 40 minute mark. * Note to self, check the accuracy of the temp in my oven*  This dish would also be a hit at any office party or your next “bring a dish” gathering, as it reheats well. Thanks to Annie, of Annie’s-Eats  who posted this scrumptious recipe last month! I would love to hear from you, let me know what you think!

tomaot cobbler

Ingredients
For the filling
2 tbsp. extra virgin olive oil
2 tbsp. unsalted butter
2 medium yellow
onions, thinly sliced
4 cloves garlic, minced
1 tsp. fresh thyme
3 lbs. cherry or grape tomatoes
3 tbsp. all-purpose flour
¼ tsp. red pepper flakes
1½ tsp. coarse salt
Pinch of black pepper

For the biscuit topping
2 cups all-purpose flour
2 tsp. baking powder
1 tsp. salt
8 tbsp. cold unsalted butter, cut into pieces
1 cup grated Gruyère cheese, plus extra for sprinkling
1½ cups heavy cream

Directions
To prepare the filling, combine the oil and butter in a large skillet over medium heat.  Add the onions
and cook, stirring occasionally, until cooked down and caramelized, about 20-25
minutes.  Stir in the garlic and thyme and cook until fragrant, 1-2 minutes
more.  Remove from the heat and let cool.

Preheat the oven to 375˚ F.  In a large bowl, combine the onion mixture, tomatoes, flour, red pepper flakes, salt and pepper.
To make the biscuit topping, combine the flour, baking powder and salt in a
medium bowl.  Cut in the butter with a pastry blender or two knives until the
mixture is crumbly and small clumps form. I used my hands, since I don’t have a pastry blender and the knife trick doesn’t work for me. Mix in the cheese.  Stir in the cream
with a fork until a sticky dough forms and the dry ingredients are
incorporated.

Transfer the tomato mixture to a 9 x 13-inch baking dish.  Using a large ice cream scoop or a ¼-cup measure, drop clumps of the biscuit dough evenly over the tomato mixture.  Sprinkle the top with
additional grated cheese.  Bake until the tomatoes are bubbling and the biscuits
are golden, about 1 hour and 10 minutes.  Let cool 20 minutes before serving.

Source: Annie’s Eats via Martha Stewart Living July 2011 via Pink Parsley Catering


Tags: , , , , ,

Blueberry Pancakes

I find great joy in waking up early and making breakfast for my family. Maybe it is because my children have yet to reach full-throttle mode! One by one, they find their way to the kitchen and plop down in a bar stool. They sit watchfully, with sleepy eyes as I cook up their morning meal. As I zip around the kitchen cooking (and sipping coffee) we start chatting, and that is what I love so much! I cherish the small talk and easy conversation we share in the mornings. I think this is when we actually catch up with what is going on in each others lives. These conversations are incredibly important to me. So… moving on to the pancakes 🙂 I have been making these for quite some time now and they have remained my kids favorite. The recipe was submitted by Kris to allrecipes.com  I tweaked the recipe a bit to suit our tastes. If you are not a fan of blueberries you can simply leave them out, the rest of the recipe will stay the same. I serve these pancakes with chicken, apple and maple sausage; they make a perfect pair!

On that note, get up early and go make breakfast for your family. It will feed your soul and your belly!

Blueberry Pancakes

Ingredients

  •                     1-1/2 cups milk
  •                     1/4 cup white vinegar
  •                     2  cups all-purpose flour
  •                     1/4 cup white sugar
  •                     2 teaspoons baking powder
  •                     1 teaspoon baking soda
  •                     1 teaspoon salt
  •                     2 eggs
  •                     1/4 cup butter, melted
  •                     1 1/2 cups fresh or frozen blueberries
  •                     cooking spray

Directions

  • Combine milk with vinegar in a medium bowl and set aside for 5 minutes to “sour”.
  • Combine flour, sugar, baking powder, baking soda, and salt in a large mixing bowl. Whisk egg and butter into “soured” milk. Pour the flour mixture into the wet ingredients and whisk until lumps are gone.
  •  Heat a large skillet over medium heat, and coat with cooking spray. Pour 1/4 cupfuls of batter onto the skillet, drop 5-8 bluberries onto each pancake, and cook until bubbles appear on the surface. Flip with a spatula, and cook until browned on the other side.   *Only flip pancakes once while cooking.


Tags: , , ,

Spiced Pumpkin Bread

I hope everyone is enjoying the kickoff to this Fall season! I know the miniscule drop in the  humidity has made a noticeable difference here in SW Florida. There still are not any weather predictions that would call for a jacket (or even sweater for that matter) however,  I am wishful that cooler temps are soon to come. Fall is probably the most welcomed seasoned of all for me. After the long, hot summer days and nights that bring along with it stifling heat that will literally take your breath away and humidity that makes you feel as if you are living in a giant sauna, the cool air and drop in humidity are as anxiously awaited here in the south. I am sure the warmth of the summer months are as embraced in the north as the fall and winter are in the south. One of these years I am going to spend Autumn somewhere that the leaves change colors! Several years ago I was able to spend two and a half days in Indiana (for the Patriots – Colts game) during November, and I fell in love with the leaves. I know that is probably quite goofy to those of you who live somewhere that actually has seasons. You might even think of the leaves as a chore, I hear you have to rake and bag them all up…

So any ways, I am trying to bring as much of the season into our home with pumpkin, winter squash and apples in as many of our meals and snacks as I can. This is a bread that I have been making since 2001 and, I plan on making it until I am not longer capable. Back then I worked in a small office. It was just the couple who owned the business and myself in a small room. Our desks practically touched. Debbie, the lady I worked for, came walking in the Wednesday morning before Thanksgiving break bearing these littles loaves of bread, all wrapped up nicely as a gift. If I recall correctly, she gave me four. One for me, one for my parents, and one for each of my girls. Embarrassingly, I think I left that day with only one loaf. I could not stop eating this bread. It is so unbelievably delicious! I must have made really big impression on her, with my bread consumption. The following month I received a cookbook (Gulfshore Delights, 1984) from her for Christmas. On the inside cover she had jotted me a note that read, “This has the recipe for pumpkin bread – plus many other dishes I think you will enjoy. There is even a recipe in this book I submitted. Can you guess which one? I bought two of these books many years ago and I saved it for just the right person. Forever, Deb”  How sweet! I never actually found out if her recipe was the pumpkin bread, but it must be right?

Treat yourself, and someone else for that matter, and make this bread. It isn’t in any way spicy, just bursting full of flavor! And, it is a one bowl bread recipe! That means it is super easy to throw together and just as simple to clean up. I baked it in 4 mini loaf pans this go-round just adjust your baking time accordingly, until a toothpick comes out clean. I filled each pan with one cup of batter. For two of the loaves I sprinkled chopped walnuts on the top before baking. That is strictly a matter of preference. I like that crunch that the nuts add to the bread.

Spicy Pumpkin Bread

  • 1 1/2 cups sugar
  • 1 teaspoon baking soda
  • 2 eggs, well beaten
  • 1/2 cup vegetable oil
  • 1/2 cup water
  • 1/4 teaspoon baking powder
  • 3/4 teaspoon salt
  • 2 teaspoons cinnamon
  • 1 teaspoons ground cloves
  • 2 teaspoons nutmeg
  • 1 cup canned pumpkin (not pumpkin pie mix)
  • 1 2/3 cup sifted all-purpose flour (I have made this bread several times in a hurry without sifting and it turned out great, but if you have time sift. It produces a lighter more consistent bread)

Directions

  • Preheat oven to 325 degrees. Mix all ingredients. Pour into a greased 5×9″ loaf pan. Bake 1 1/2 hours. For four mini loaf pans and bake for about 35 – 40 minutes.


Tags: , ,

Homemade Fresh Ricotta Cheese


Ricotta cheese is good. You can stuff pasta with it, bake a ricotta pie, add it to mashed potatoes, top your pizza, pair it with fresh fruit, ricotta on top of figs and drizzled it with honey is out-of-this-world, eat it right out of the container, canoli, the list could go on and on… I have always liked ricotta cheese with its mild taste and smooth texture make it easy to incorporate into many meals.

Prior to yesterday the thought of making cheese had not really crossed my mind. Cheese was one of the items you buy at the grocery store, not whip up in your kitchen. Let me tell you friends, I will never buy ricotta again! The difference in taste and texture of the homemade in comparison to store-bought is basically indescribable. The best way I can explain the difference would be like asking you if you would rather eat a hamburger steak or filet mignon! Really, it is that good. While the cheese was straining in a cheesecloth lined colander on the counter, I took a spoon and had a small sample. That was all it took, I knew I had found something good, a new favorite food (I have many favorites) I am hooked! Homemade ricotta cheese is fantastic!

One day, very soon, I will attempt to make fresh mozzarella . A while back I posted a recipe for Caprese, which is my first choice of appetizers, hands down. This was also the winning entry for September’s recipe contest at  C & L Farms, located in Alva, FL. I absolutely love this salad as it is, and I can only imagine how much better it would be with homemade cheese! I am so looking forward to this 🙂 I will definitely let you know how it turns out.

Back to the ricotta, as you will see below this recipe only calls for four (4) ingredients and it is super easy, you don’t even need a thermometer!

Ingredients

  • 4 cups of whole milk
  • 2 cups of heavy cream
  • 1 generous teaspoon of sea salt
  • 3 generous Tablespoons White Wine Vinager


Directions

  • Line a sieve or colander with 2 layers of dampened cheesecloth. Put the colander over a large bowl.
  • Pour the milk and cream into a stainless-steel or enameled pot. Stir in the salt. Bring to a full boil over medium heat, stirring occasionally. Turn off the heat and stir in the vinegar. Allow the mixture to stand for 1 minute until is curdles. It will separate into thick parts (the curds) and the milky parts (the whey).
  • Pour mixture into the cheesecloth-lined sieve and allow it to drain into the bowl at room temperature for about 25 minutes. The longer you allow the mixture to drain, the thicker the ricotta.
  • Transfer the ricotta to a bowl, discarding the cheesecloth and the liquid in the large bowl.
  • Use immediately or cover with plastic wrap and refrigerate. The cheese will keep refrigerated for 4 to 5 days.


Do yourself a favor and make a batch of this deliciousness! I would love to hear what recipes you use that call for ricotta cheese.

The picture at the top and bottom of this page is:

1 baguette sliced and put under the broiler until crisped on the top, rub with a clove of mashed garlic (the garlic catches on the crispy bread) add a dollop of ricotta cheese, drizzle with extra virgin olive oil, sea salt & cracked black pepper to taste and garnish with fresh rosemary! Good Vittles friends 🙂 enjoy

This recipe has been adapted from Barefoot Contessa, 2010


Tags: , , , , ,

Butternut Squash Muffins

I am continuing to enjoy the all of the flavors that define Fall. As I have mentioned before, I love squash! While I was at my local produce stand this weekend I couldn’t resist the butternut squash, they looked wonderful. This means that we will be having it in several meals this week.

One of the things I like most about butternut squash is that is a great in both savory and sweet  dishes. I decided to go with a sweet treat first 🙂 Today’s recipe is a muffin that is delicious and not overloaded with sugar. I used applesauce and some mashed banana to add some sweetness in place of just using sugar. Also, in trying to keep this treat on the healthier side I used half whole wheat flour and half white flour, if you don’t like the taste of whole wheat flour or don’t have any on hand you may use all white flour. The brown sugar and cinnamon topping is optional, but I highly recommend you do not skip it. It’s the icing on the cake! I will tell you this is the first time I have made these muffins and they were great! The only thing I will change in the future is to add some walnuts to the batter, I love the taste and the crunch that the nuts add to most quick bread and muffins.

Moving on, if you are planning on making more than one meal during the week that call’s for cooked & mashed or puree’ squash, I would cook it all at the same time. Put the squash to be used at a later time in the refrigerator. It save time and energy.

Ingredients

  • 1 mashed banana
  • 1 cup cooked and mashed butternut squash (directions at the bottom of page)
  • 4 eggs
  • 1/3 cup applesauce
  • 1/3 cup white sugar
  • 6 Tablespoons canola or vegetable oil
  • 1 teaspoon salt
  • 1 teaspoon baking soda
  • 2 teaspoons baking powder
  • 2 teaspoons cinnamon
  • 1 cup whole wheat flour
  • 1 cup all-purpose flour

Optional Topping (not optional)

  • 1 teaspoon cinnamon
  • 1/4 cup brown sugar

Directions:

Mix together banana, applesauce, squash, eggs, sugar and oil, until well blended.

In a separate bowl mix salt, soda, powder, cinnamon, and flours.

Add dry ingredients into the wet. Mix until batter forms.

Pour into greased or lined muffin pans.

Combine brown sugar and cinnamon. Sprinkle onto muffins.

Bake at 350 for 16-18 minutes!

This recipe makes about 24 regular size muffins.

* Directions for cooking the squash – Preheat oven to 425 F. Line a cookie sheet with tin foil and spray with non-stick cooking spray. Cut squash in half lengthwise and scoop out seeds. Brush cut sides with melted butter. Place squash cut side down on pan. Bake about 45 minutes or until squash is tender.

Peel the skin off and put the ‘meat’ of the squash in a bowl and mash.


Tags: , ,

Pumpkin Scones

Something rare happened today. I was able to get out of the house for a few hours without any children! This might sound like a common thing to most of you, but I assure you, it was BIG for me. I almost always have my at least two of my youngin’s with me, which I wouldn’t change for anything. However, it is quite nice to have a break every once in a while and actually have adult conversation without my babies needing me.

My morning started off at Starbuck’s where I met my sister and a friend (and my next must-try, must-share food). As I stood in line waiting to order, my attention was drawn to the pumpkin section in the baked goods display case. There was pumpkin bread and pumpkin scones. Both looked delicious but I couldn’t pass on the scone, it was too tempting. Covered in a sugary glaze and drizzled with a spiced version of the icing, I just couldn’t resist. Afterall, this was a special occasion, which is how I convinced myself to splurge on the high-calorie treat. It was just as delightful to eat as it was to look at. I don’t have scones very often, this one was more moist than what I expected, which is a good thing. The icing provided just enough sweetness without overpowering the flavor of the pumpkin. It was the perfect scone in my book!  I am sure for those of you who have had one, you know and agree. My mind was made right there, I had to come home and try to recreate this breakfast/brunch biscuit.

In the past I have thought about trying to bake scones, but until now I have avoided making them. For some reason I think I was intimidated by them. I am not much of a baker, the whole measuring thing gets me.

I found a recipe at http://www.momswhothink.com and let me tell you these mom’s know what they are doing because the scones turned out to be phenomenal. The taste and texture are spot on. Don’t wait to try these fabulous Fall treats! I am excited to venture off into experimenting with different flavors of these British breads, I am thinking the possibilities are endless!

I followed the directions just as they were written except when I was cutting the first rectangle of dough into triangles. I was confused and instead of cutting it in half I cut it into thirds. I think I prefer the thirds or mabe even quarters instead of halves. The recipe says it makes 6 scones, but they are 6 large (too large for me) scones. I could easily get 9-12 out of one batch. If you do this you probably will need to adjust the bake time by a couple of minutes.

Starbuck’s Pumpkin Scones

Scones Ingredients:

2 cups all-purpose flour
7 Tablespoons sugar
1 Tablespoon baking
powder
1/2 teaspoon salt
1/2 teaspoon ground cinnamon
1/2 teaspoon
ground nutmeg
1/4 teaspoon ground cloves
1/4 teaspoon ground ginger

6 Tablespoons cold butter
1/2 cup canned pumpkin
3 Tablespoons
half-and-half
1 large egg

Sugar Glaze Ingredients:

1 cup powdered sugar
1 Tablespoon powdered sugar
2 Tablespoons whole
milk

Spiced Glaze Ingredients:

1 cup powdered sugar
3 Tablespoons powdered sugar
2 Tablespoons whole
milk
1/4 teaspoon ground cinnamon
1/8 teaspoon ground nutmeg
1 pinch
ginger
1 pinch ground cloves

Scones Directions:

1. Preheat oven to 425 degrees F.

2. Lightly grease a cookie sheet or line with parchment paper.

3. Combine flour, sugar, baking powder, salt, and spices in a large mixing
bowl.

4. With a fork, pastry knife, or food processor, cut butter into the dry
ingredients until mixture is crumbly and no chunks of butter remain. Set
aside.

5. In a separate mixing bowl, whisk pumpkin, half and half, and egg.

6. Fold wet ingredients into dry ingredients. Form the dough into a ball.

7. Pat out dough onto a lightly floured surface and form it into a 1-inch
thick rectangle (about 9 inches long and 3 inches wide).

8. Use a large knife to slice the dough into three equal portions. Cut
diagonally to produce 6 triangular slices of dough.

9. Place on prepared baking sheet from step 2.

10. Bake for 14–16 minutes until scones turn light brown.

11. Place on wire rack to cool.

Sugar Glaze Directions:

1. Mix the powdered sugar and 2 Tablespoon milk together until smooth.

2. Brush glaze over the top of each cooled scone.

Spiced Glaze Directions:

1. As sugar glaze firms, combine the spiced icing ingredients.

2. Use whisk to drizzle over each scone and allow to dry before serving.

Makes 6 pumpkin scones.

This recipe was adapted from www.momswhothink.com


Tags: , , , , ,

Banana Blueberry Muffins

As a child growing up, I can still remember waking up to the smell of blueberry muffins baking away in the kitchen. It was definitely one of my favorites! I must admit, I always made an attempt to choose the one with the most berries, before my sisters had an opportunity to. Oh those were the simple times…

There are several foods in our home that do not know seasons. Blueberry’s and bananas are two of them. You will find these scrumptious fruits in my kitchen everyday of the year. I always try to keep both, bananas and blueberries, in the freezer for my kiddos, who love to make smoothies with them. Meanwhile, I like to keep them on hand for mid-morning muffins and quick breads. Who doesn’t like to indulge in a sweet, delicious muffin full of fruit, when it is still warm from the oven? I know that I cannot resist!

For many, many years now I have used the same recipe for my banana muffins. All of the variations to the muffin are just that, an addition to my trusty recipe. This is a recipe that is worthy of change. I do believe I have a new banana muffin recipe that will replace my old staple. I have yet to try switching up the blueberries with the various other combinations such as chocolate chips, pecans, walnuts, etc… but I do belive that this recipe will be just as adaptable as my ol’ faithful.

I discovered this recipe online while checking out other blogs,and it called my name. The origin of these must-try muffins comes from a hotel in Washington, The Weinhard Hotel and was shared by the ladies from http://www.fullforkahead.com/  take a moment to check out their wonderful dishes!

  • 2 eggs, room temperature
  • 1 cup unsalted butter (2 sticks), room temperature
  • 2 teaspoons vanilla
  • 6 ripe bananas
  • 2 cups sugar
  • 4 1/2 cups all-purpose flour
  • 2 teaspoons baking powder
  • 2 teaspoons baking soda
  • 1/2 teaspoon salt
  • 3 cups frozen blueberries

Preheat oven to 350 degrees. Line 2 12-count muffin pans with liners or spray with nonstick spray.

In a large bowl, mash the bananas. Whisk or stir in the eggs, butter and vanilla. Set aside.

In a separate bowl, whisk together the sugar, flour, baking powder, baking soda and salt. Add to the wet ingredients and stir till combined, making sure all flour on the bottom of the bowl gets incorporated.

This batter is thick, do not overmix. You will end up with tough muffins 🙂

Fold in the frozen blueberries (yes, make sure they stay frozen, it helps them to not settle to the bottom of the muffin well). Spoon enough batter into each muffin well to fill it just to the top. Bake for 30 minutes or until starting to turn golden brown. Place pan on a rack till muffins are cool enough to handle, then remove them to cool further. Serve warm with a small pat of butter, enjoy with your coffee or however you prefer.

This recipe was adapted from www.fullforkahead.com and originally from The Weinhard Hotel.


Tags: , ,

Banana Walnut & Chocolate Chip Bread

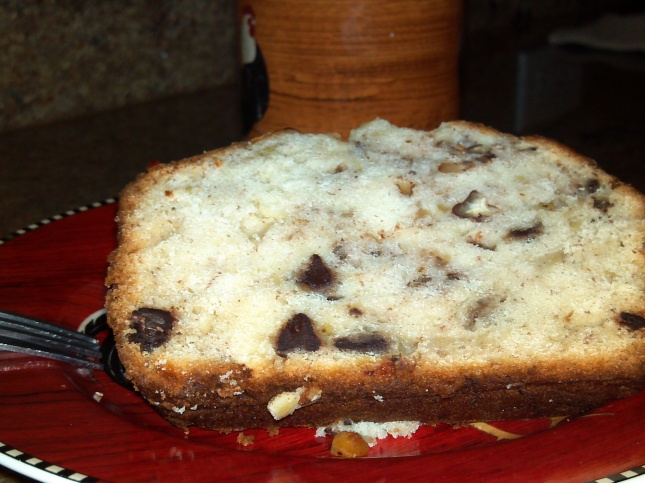
When this loaf of banana bread comes out of the oven I simply cannot wait for it to cool off before I give in to temptation and cut a small piece out of the corner, hoping it will go unnoticed, and pop it into my mouth! This banana bread is a moist, sweet but not too sweet, hearty, bread. The combination of the creamy banana, sweetness of the chocolate and the crunch of the walnuts is a heavenly trio that is easy to throw together and is the perfect accompaniment to coffee (or milk if you aren’t a coffee drinker)! I always make two loaves at a time. We enjoy one fresh out of the oven, and the second loaf is off-limits until breakfast the following morning when I use it to make Banana Bread French Toast… Oh yes, it is delicious! There is no need for syrup or jam, I simply dust the bread with a small amount of powdered sugar and enjoy!

Back to the original loaf. This recipe if extremely versatile, you can swap out the chocolate chips & walnuts for what suits your taste buds, or what you have on hand in your pantry. Pecans, butterscotch chips, raisins, cinnamon chips, toffee pieces, Crasins, dates, peanut butter chips, blueberries, and pistachios are all easy to switch with the original add-ins. Just remember if you use blueberries that are frozen they must be thawed and tossed in all-purpose flour prior to adding to the dough and don’t over mix. Over mixing quick bread or muffin dough will make them tough.

Leave me a comment and let me know which add-in combination you like best!

Once this bread is in the oven your home will be filled with a delightful aroma that will leave you anxious for the timer to go off!

Banana Walnut & Chocolate Chip Bread:

1/2 cup butter, softened

1-1/2 cups sugar

2 eggs

1 cup mashed ripe bananas (about 2 medium)

2 tablespoons 2% milk

1 teaspoon vanilla or rum extract

2 cups all-purpose flour

1 teaspoon baking soda

1/2 teaspoon salt

3/4 cup chopped walnuts

1/2 cup semi-sweet chocolate chips (I prefer the miniatures)

  • In a large bowl, cream butter and sugar until light and fluffy. Add eggs, one at a time, beating well after each addition. Stir in the bananas, milk and extract. Combine the flour, baking soda and salt; gradually add to banana mixture just until moistened. Fold in nuts.
  •    Pour into a greased 9-in. x 5-in. loaf pan. Bake at 325° for 65-75 minutes or until a toothpick inserted near the center comes out clean. Cool for 10 minutes before removing from pan to a wire rack.

* This recipe is adapted from: Taste of Home

To make the French Toast:

Heat skillet to medium-high heat.

 Slice the completely cooled banana bread with a serrated knife, slicing it about 3/4″ thick. This is to prevent the bread from crumbling, and is to keep the bread in tact while it sizzles away in the skillet.

Whisk together: 4 eggs, 2 TBSP Milk, 1/4 tsp. Pure Vanilla Extract, & 1/4 tsp. ground cinnamon.

Dredge the sliced bread in the egg mixture and immediately put in the pre-heated pan. If the pan isn’t non-stick I spray with cooking spray right before I add the bread.

Cook approximately 2 minutes on each side.

Garnish with a dusting of powdered sugar and enjoy the good vittles!

 
8 Comments

Posted by on August 31, 2011 in Breads & Muffins, Fruits & Nuts